Thursday, July 29, 2010

Oreo Truffles


This is a conflicting recipe. It calls for oreos which are my least favorite of all snack foods (I know, how can I be a mom and human and not like them??) and chocolate which isn't always a favorite of mine.

However, it also calls to mix those ingredients with Cream Cheese, and that's why this recipe is for me.

Here's what you need:

1 - package of oreo cookies (I used generic brand)
1 - package of cream cheese (8 oz)
1 or 2 - bags of semi-sweet chocolate chips
a way to mash the cookies (i used the good old rolling pin and
plastic bag method, but a hand mixer works as well

Prep time: 10 minutes
total cook time: depends (for me 2 hours - includes an hour + of refrigeration)


Step 1: Crush cookies until they are a fine dusting (or as close to fine as you can get


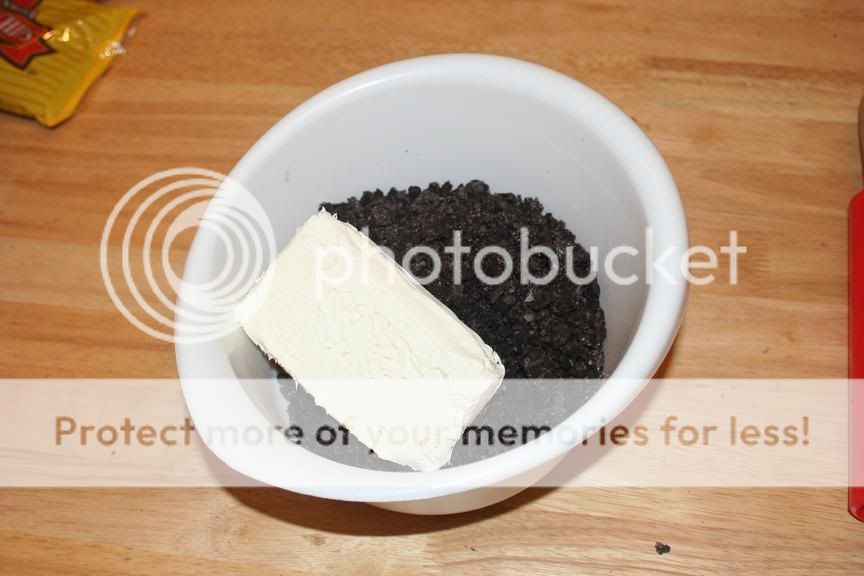
Step 2: add cream cheese to the chopped oreos (it's best if cream cheese is room temperature, but if using a mixer it will work still cold)


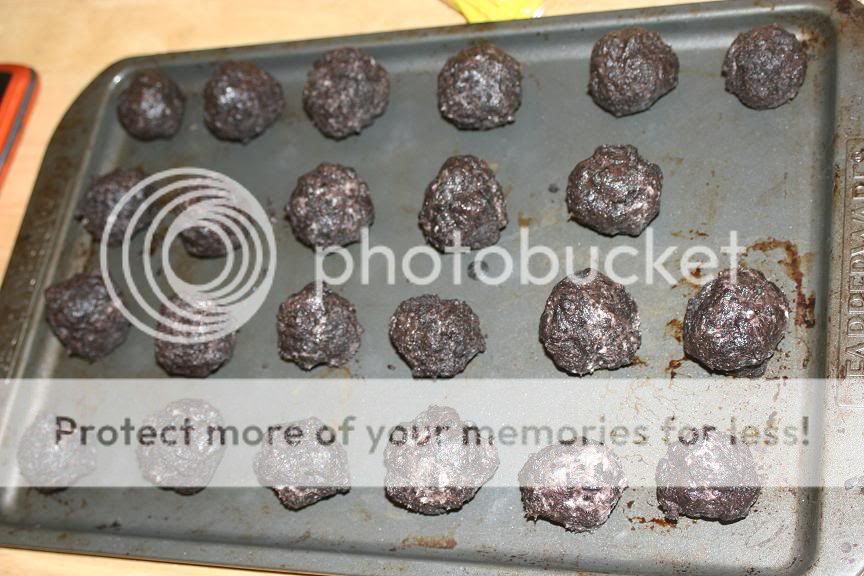
Step 3: Rolls the mixture into small 1" balls (they look like meatballs). Place these balls on a tray to cool in the refrigerator. They should cool for about an hour to make them a little easier to use later on.


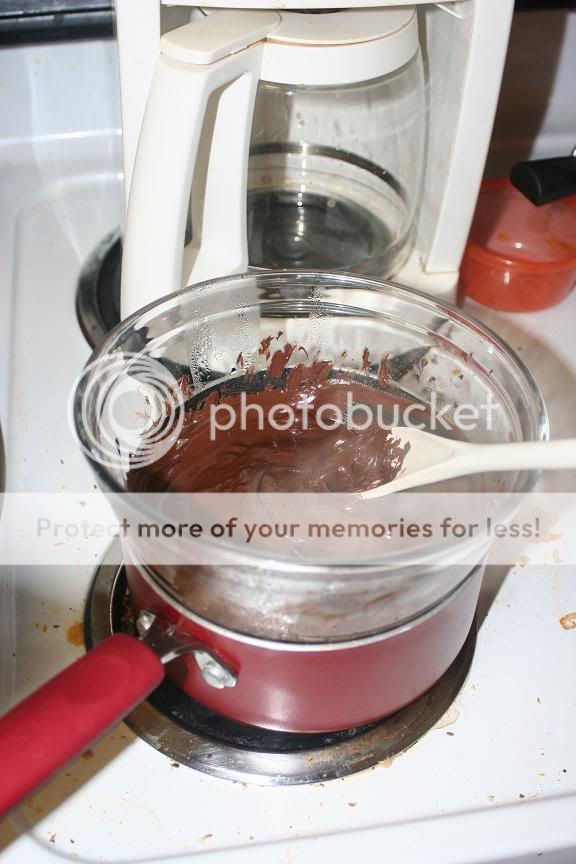
Step 4: You need to use a double boiler to melt your chocolate chips. I don't have a double boiler so I always improvise (sorry for the messy stove).
-for anyone who needs to know how to create a double boiler what I used was a small sauce pan half full of water an a glass mixing bowl. I let the water boil, set the glass bowl inside with the chocolate chips and stirred the chips until the consistency was right.


Step 5: This part is the hardest in my opinion. The point is to cover the oreo balls with the melted chocolate. It does not take long for the chocolate to start re-hardening so you have to be quick about this process. Many people suggest using two forks to hold the ball and allow the chocolate to drip through the slots. My chocolate is never runny enough to drip so I usually just use my hands or a spoon. They don't have to be perfect so have fun, and involve the kids on this part most of all!!!

And when you're done coating I recommend putting them back the fridge or freezer to harden the chocolate. As you can see mine didn't turn out great esthetically, but they are delicious.
I will warn you though, these are very very very rich. I can usually only eat one at a time and I have to include a whole glass of milk.

You can also try other ingredients, peanut butter oreos, peanut butter chocolate chips, adding vanilla flavoring. Test it out, and see what you think!!

Bon Apetite

Monday, July 26, 2010

Losing my CVS virginity

Frugality is a foreign word to me. When I see something I don't check for a coupon or a sales price, if I want it I grab it. No wonder I have credit debt. So I have been reading lately about thrifty frugal moms, and decided maybe it's time to start saving.

My husband thinks I am ridiculous spending the time and effort to cut the coupons hand write the different ways to save (at CVS) and why would I buy something just to buy it. But I think for me it's about knowing I got a good deal, on things we will use sometime in the future if not immediately.

So after all the talk about CVS and their Extra Care Bucks I decided to give it a go.
For detailed directions visit HERE. That site has everything you need to know about using the CVS program to your advantage.

Essentially the point is that there are certain items in their store that if you purchase them with your CVS card you will receive ECB's. This is like instant money that prints up on your receipt. Many women make 4-5 transactions per time in CVS so it is like a math game.

Here is my small start:

What I got:

2 - 12 packs of coke products

1 - box of 96 count size 3 Pampers

1 - Tylenol Precise heat pad

1 - box of 18 count Kotex pads

Total Cost: $23.98 (it's my first time)


Break down:
Transaction 1: Pampers $21.99 (save $2.00) - buy 1 get $10 ECB (like paying $11.99)
Kotex $4.99 - buy 1 get $4.99 ECB (making it free)
COUPON $2 off pampers (from in home flier)
COUPON $1 off kotex (printable online)
TOTAL = $23.98 and I got $14.99 in instant ECB's

Transaction 2: 12 Pack of Coca Cola $2.98 (save $2.41)
12 pack of Dr Pepper $2.98 (save $2.41)
Tylenol Precise Heat Pad $5.99 (save $2.00)
COUPON $1 off Tylenol product (printable online)
ECBS $10.00
IN STORE COUPON $2.00 off Tylenol Precise (only had $0.98 left)
TOTAL = $0.03 cents (cashier rang it up as cash before we paid and said it was $0)

Price without discounts/ coupons/ ECB's = $50.62
total cost with all discounts/ coupons/ ECB's - $23.98 with $6.99 in ECB left!

SAVED ALMOST 50%

Sunday, July 25, 2010

One Hot Diaper Bag

I want to start Reviewing products and the first thing that came to mind was our new diaper bag from California Innovations.

Unfortunately from what I am finding this diaper bag is no longer available (online at least) which is upsetting.

The bag retailed for $49.99 at Babies R' US - we bought ours about three months ago at 50% off for $24.99!!!! What a deal!

Our main reason for buying a new bag was that our old one had been stained and it was a little too girly for my husband who is usually the one carrying it (plus we have a son).


Features:
OUTSIDE OF BAG
-Side Pockets:
- Insulated pocket - a lined pocket which is perfect for storing bottles in a controlled temperature. We usually have cold milk and it keeps the bottles cold for a much longer time than if we stored it in a normal pocket
- Zip pocket with a mesh pouch for holding smaller items. There is also an attached carribineer clip on a key ring which can be remove. We don't use this but it would be good for a pacifier, or keys.

-Front zip pocket
- Has a flap which close via (wait for it) MAGNET!!!! The magnet flap opens to reveal a clear ID style window
- The pocket itself has a small space for random items (we keep the graham crackers here) and the pocket for your personal ID

-Back Velcro Pocket - good for papers, or flat items (we use it to house doctor information)

MAIN BAG

-MAGNETIC FLAP!!! - that's right!! this is the only bag I've seen (there may be many others) that closes with a magnetic strap. It also has a zipper closure underneath which keeps items in their place but the top flap flips over and secures itself with very minimal work. even when we pack the bag full, it's always seems to close. there is a magnet on both the left and right sides of the flap which gives it extra security and it is so much quieter than Velcro.


-Pockets- both sides of the cavernous bag have pockets. two per side. the back side pockets are a netting stretchy material which is great for baby food jars, toys, or more bottles. The front side pockets are a thin plastic material. The pockets offer more room than we can find stuff to fill them with


EXTRAS

-Changing pad

-the pad is normal thickness, but it has some nice features. It folds into quarters and has a Velcro strap that keeps it closed. Attached to the sides of the pad are two Ziploc style plastic pockets. I keep two diapers in the one and I keep my travel wipes case in the other (yes it still all fits when you fold it up and Velcro it shut!!!!


-Small travel bag?

-the bag came with a small Ziploc style thin plastic "clutch". I'm not sure the correct use but ours went quickly from the diaper bag to the floor in the closet because we had no use for it. It might be good to hold baby spoon, Kleenexes, or more wipes.


-Shoulder Strap

-the shoulder strap is about 2 inches across and is a very strong material. The strap came bundled up and very short but it will expand to a length where when it's on my husband's shoulder it will hang directly at his knee. No one should need it that long, but it does have the capability of increasing in length. When shortened completely I would say it sits about a foot above the bag itself


-Color

-the color is great!! We went looking for a more masculine bag for the boys and the color is a rich gray-blue with a black accent. The inside is a light gray, and it's got gray piping. It just looks like a manly bag


All in all this bag is absolutely amazing. There are so many compartments to store stuff and even when the bag is full it's still very manageable in size and it doesn't bulge up the way many bags do. The price was a steal, and it's blue and black

Saturday, July 24, 2010

a Steal of a Deal


So I promised a blog on how I bought the new Finish quantumatic
for roughly 80% off the retail price. We were also able to get a bottle of Finish dishwasher cleaner for 55% off.

I have wanted to try both products for a while but I knew they were pricey. So I was browsing the online coupon blogs and thought to check the Finish website for coupons on their products. Low and behold I found 3 coupons (i only used 2 today).

I made a trip to Wal-Mart (don't hate) and found that both items were on sale. I also had coupons so I was lucky to get both items for an insane steal... see equations below...

Quantamatic - $9.47 - regular price
$4.97 - sales price at Walmart
-$3.00 - manufacturer coupon
$1.97 paid for a $10.00 product (awesome!!!)

Dishwasher cleaner - $4.97 - regular price
$2.97 - sales price at Walmart
-$0.75 - manufacturer coupon
$2.22 paid for a $5.00 item

and that is how I saved a butt load of cash on this hopefully great product. A review will be posted at a later date

Friday, July 23, 2010

Date night, or late night?

I love my son with all my heart, but let's face it... once you have a child it becomes that much harder to find time to spend alone with your significant husband. My husband and I live about 6 hours away from both respective sets of parents, and have no family in the area. We aren't really the "go and meet the neighbors" kind so we are basically stuck without a babysitter most of the time. Finding a time to call "ours" in this situation becomes extremely difficult. So I would like to present some options for couples in similar situations.

My husband and I make sure every night that we watch jeopardy together. We get to show off our lack of knowledge, but we always joke that together we would make the best contestant. It's nothing special but it's a half hour where he and I are always together no matter what.

Here are some other ideas for couples to enjoy themselves even when a babysitter isn't available....

clear out the living room and enjoy any of the following:

picnic dinner on the floor:

a friendly Wii competition:


A nice slow dance, or any dance
(here's a song list for you)

You could Always try a nice bath together (assuming unlike us you can both fit in the bathtub)


There are quite a few games out there you could try:


And finally, I found this online, and it would be the perfect addition to any chilly night together (a snuggie with four arms... yikes!!!)

Thursday, July 22, 2010

10 for $10

I was inspired by many blog postings lately to search online for some Etsy finds that you can get for exactly $10 (well, not counting shipping). Since most of my ideas are wedding related I decided to do a search for $10 wedding items. I hope you enjoy the finds!!


1. A hand sewn gingham and teal ring bearer pillow (shameless plug for HartOfStone - at my old shop)


2. The most adorable magnets I have ever seen (can order without magnet back) created by MonkeysOnTheRoof


3. Beer cap cufflinks for the "manly" man compliments of Aristocrafty


4. These adorable votive/tea light candles brought to us by levicp11


5. Small corked glass wedding favors from OurRootsandWings


6. Another great gift, personalized glasses via MyArtisticEscape


7. For a book themed wedding, or just a chic gift. A custom moleskin notebook sold by oneswellgal


8. Silkscreen lavendar sachets, a great gift for bridesmaids courtesy of veronicasun (these would have been great for my own wedding)


9. lilmissi has some amazing products (my favorite is only$6 so it will be featured later). These are screen-printed coasters. Fabulous!!


10. Vintage spoons from seller Hammermann (used as table numbers - but they are hand stamped so they could be customized I would assume

Wednesday, July 21, 2010

Tu^3-torial

I searched online for ideas and tutorials on how to create a tutu, and the basic concept was the same but everyone puts their own spin on things, minor touches you can change here and there. So I came up with my own tutorial to show you all how I create my poofy little creations.
(this tutorial is for a basic hand tied tutu using tulle)

Step 1: Gather materials
Tulle
(you can use any color or any number of colors) I usually use about 10 yards of cut tulle, or 2 rolls (50 yards). This is good for a 15" tutu. For this tutorial I used a 25 yard roll of ivory and a 25 yard roll of pink, but will include photos for anyone using regular by the yard tulle
Ribbon or elastic (I usually use 1" ribbon or 1/2" elastic ribbon)
Needle and thread
Rotary Cutter (if you have one they come in very handy)

Step 2: Measure your little one:
Waist: Simple enough, measure around where you would like the skirt to hit. Keep in mind when you are using Ribbon to triple the measurement (if she measures 15" cut your ribbon to 45"). IF you are using elastic make sure to cut the elastic roughly 2" shorter than her measurement (15" and you would cut at 13")
Length of skirt: There are sites that have averages but if you are making your own make it custom. If you want a foofy floor length tutu measure from her waist to the ground. If you want more ballerina then measure waist to knee. It's up to you. Typically When I do a 15" waistband I will cut the tulle so that it falls to 10" (I will discuss cutting the tulle later)

Step 3: If you are using elastic you need to sew the ends together to create a circle
Photobucket

Step 4: cut your tulle (this is where a rotary cutter comes in so handy). If you use the large yardage of tulle from the fabric store this part can be time consuming. You need to cut long strips to use. You can make your strips any width you want but I usually use 5" strips. The best way to do this is to lay the fabric out, cut it into smaller pieces (i measure off 30" pieces), roll the fabric up, and cut it in to 5" sections (refer to pictures)
PhotobucketPhotobucketPhotobucket

If you are using the rolls of tulle they come in 6" which you can leave as is, this is very simple.

Step 5: Now you must cut the strips in to your desired length, it is important to remember that you must double the measurement you wanted (my skirt will be 10" so I will double it to give me 20"). Also it is recommended that you add a little extra to account for the ribbon or elastic (I usually cut mine to 22" to be safe)
Photobucket

You should end up with a hefty stack of tulle strips (6"x22" in this case)

Step 6: It's time to start tying the tulle to your ribbon or elastic. The best tipe I've found was to use your thigh to stretch the elastic to work with. You can also use something of a similar size, as it is 100 times easier to tie knots when the elastic isn't moving around on you.
I gather up two strips of tulle together (you can use one, two or three, up to you) and fold them in half keeping the looped end by my fingers.
Photobucket

Some people use shoelace knots, but I prefer the larks head (or macrame) knot (photos below). It is important to not tie your knots too tight, as this will cause the elastic to bunch and it won't stretch the way it should. I have found it very very very difficult to keep the ribbon un-bunched so I usually let it roll up under the knots.
PhotobucketPhotobucketPhotobucket

You continue doing this until the entire waistband is covered in knots.
Photobucket
I like to tie mine very tight and pack in as many as I can, but you can leave them looser if you want a more flowy skirt, again play around to see what you think is best.

Step 7: Enjoy your creation!!
Photobucket

Side note: The tutu in the photo was created by putting two knots of each color together. You can create any pattern with your knots. Experiment with colors, and patterns and enjoy the variations that are possible!!!!

Tuesday, July 20, 2010

Tulle Academy

So for those who don't know my newest hobby has become creating (or trying to) tutu's. Aside from dance costumes I never owned a tutu so when I started this new endeavor I had to become acquainted with all that was tulle.

I searched online for demos, instructions, videos, and ideas that I could use to create these poofy accessories, and almost every tutorial I found had the same information.
{Side note} My tutorial will be up soon... Everyone said either one of the following:
-tulle should cost less than a dollar a yard
or
-you can buy rolls of 6" tulle at your local fabric store.

In my conclusion these statements are both 90% false (at least in the Philadelphia area at your chain crafts/fabric stores).

I searched our local giant fabric store for tulle and found a variety of options, large holes, small holes, soft, rough, glitter, shimmer, matte, and "illusion" which has crystals glued on. But the cheapest I could find was $1.49 a yard. I know the difference is only $0.50 BUT when you need 10-20 yards per tutu that is $5-$10 that everyone else seems to not have to spend.

The rolls of tulle which are 6" by 25 yards are just impossible to find. I asked two associates at different stores if they carried the rolls and I got glassy eyed confused looks. Even at this large chain's website you can only find 3 or 4 color choices. People online seem to have a rainbow of choice for a mere dollars a roll.

I did find several websites that sell the rolls, but I had already purchased a large amount of tulle and needed to make a sale before i went and bought anything else. Papermart $1.84 a roll, BBCrafts $1.85 a roll (with bulk buy options), smartyhadaparty $1.99 with a small selection of colors.

So i thought I was doomed to settle for the dreaded online order and wait, BUT today I was searching around a local chain craft store (note craft not fabric) and I found in their wedding sections a large assortment of 6" rolls of tulle!!!! Now as happy as I was I couldn't help but be taken aback by the price, almost $4 a roll. This couldn't be my one stop shop for all things tulle, but at least I knew that there was someplace in the county I could find tulle without paying for shipping and waiting 7-10 business days

Also, I happened to check our local Wal-mart in their fabric department and did find a few colors of tulle for $0.97. Granted the colors were ivory, gold, brown, and white but it does exist, tulle for less than a dollar a yard!

So I hope you can look past all my ranting, and use this information to your advantage when you go out looking for tulle, as many of you will I'm sure :-P
-HOS

Monday, July 19, 2010

Welcome

Welcome to my blog!! My name is Miranda. I am a stay at home mom, a wife, and a crafter at heart. I recently found the inspiration to start a small crafting business and this will be the link between my ideas and my shop.

You can expect to see a variety of different entry topics on this blog, including; new items in the "store", craft tutorials, random daily thoughts, blogs about my family, and entries on my favorite passion...wedding planning.

I hope anyone who reads this will find something inspiring withing my entries. Of course, this is my first entry so don't get too excited yet :-)

NOW a brief BIO and what got me started:
I am 25 years old. I had my son 13 months ago (July 2009) and it has completely changed my life. I had been working two retail jobs and needed a change so after much deliberation my husband Nathan and I decided that I should take some time off to become a stay at home mom. The decision has not been easy as income is quite tight, but that is what led to the creation of HART OF STONE.

June 25th Nate and I celebrated our wedding. As my photographer Kristen said it was very "etsy". I did most of the decorating myself, created the invitations by hand, and down to the last detail planned everything almost single-handedly. I learned how to create unique crafts and what's more, learned how to google for just about anything on the internet. If it's been written about, sold or blogged I have probably seen it. I hope to get up some DIY craft projects from my wedding as well as a few pictures in the coming weeks. The fact that I could create so much stuff for my own wedding led me to believe that I could create art for other people to use on their special day, or anywhere really.

My craft persona is yet to be defined. I love all things "country chic". I love using gingham and burlap, and antiqued woods for projects. Nothing beats a good crackle paint LOL. I am trying to create everything from wooden plaques to covered vases, to fake mustaches!! I have also taken on the challenge of learning to create beautiful tulle tutus and hair clips. Needless to say I've spent a good deal of time at my local Jo-Ann store finding fabric and tools.

Now all that's left is to create, and sell!! I hope you all join me on this journey as a stay at home mom becomes a stay at home crafting business entrepreneur (okay let's start small, just a stay at home crafter HA HA)

Stay tuned!!